Pages

Saturday 14 July 2012

FACE MAKEUP

5 steps makeup:

Steps


  1. 1
    Put on lip makeup.
    • Round Face: Put on a ruby red lipstick or shiny dark pink lip gloss. This will make your face appear more bold, and not too rounded.
    • Heart-shaped face/Oval: Since heart-shaped and oval-shaped faces have high cheek bones and a narrowed chin, add a soft color like rose on the upper lip, and a bold shade like cherry on the bottom lip. This will focus more boldness to the bottom part of the face, evening out the top part and bottom part of the face.
    • Square Face: If you have a square face, the jaw will appear larger than the forehead. Avoid dark shades and use light colors like a soft orange shade, or a pale pink, but not light as in neon, like hot pink, this will add more focus to the lower part of the face.
  2. 2
    Apply Lip liner.         


    • Round Face: Put a small amount of liner to the sides of the lips, giving your face a less rounded look, but more straight around the edges.
    • Heart-shaped face/Oval: Apply a little more lip liner on the bottom than the top, evening out your face.
    • Square Face: Softly apply a wide but light border of liner on the edge of your lips, making it look like a shadow. This will make the edges of your face appear softer, and not as square.
  3. 3
    Put on blush.

    • Round Face: Put on a good amount of blush, preferably a fairly dark shade, again, this will give your face a more bold look. Just be sure not to apply too much blush, or you'll look like you got a bad sunburn, and this won't look good.
    • Heart-shaped Face/Oval: Avoid too much blush, you don't want to much makeup on the area where your cheeks are, remember, heart-shaped faces already high cheekbones. Just apply a light amount of a soft pink blush on your face. If you already have rosy cheeks, you probably don't need blush.
    • Square Face: Put on a fair amount of blush in circular motions with a medium-sized brush. If you have fair skin, avoid putting on a bright shade of pink, you want your skin tone to look even.
  4. 4
    Now, it's time for eye makeup. Start with eye shadow.

    • Round Face: Put on a dark purple shade of eye shadow.
    • Heart-Shaped Face/Oval: Apply soft colors of eye shadow, like pale pink, mint green, or sky blue.
    • Square Face: Put on unique colors like scarlet, periwinkle, and lavender. Remember, a square face is unique and different, so unique colors of eye shadow will bring out your facial features, especially your eyes.
  5. 5
    Now, simply put on black mascara, or whichever shade you feel comfortable with. Whatever face shape you have, a nice amount of mascara will bring out your eyes, making your eyelashes appear longer and bolder.if you have a heart shaped face don't put to much eyeliner on because this will make the shadows under your eyes more noticeable


Thursday 12 July 2012

STEPS TO APPLY LIP STICK

HOW TO APPLY LIPSTICK:


A beauty tip I've always sworn by is to pick your best feature and play it up. If you are complimented often on your lips, consider yourself lucky; it's time to accentuate them. Here are 16 tips on how to apply lipstick.
  1. Don't play up the eyes and the mouth Women who wear heavy eye makeup and dark lipstick can look clownish. If you want to wear This is a link red lipstick, keep the rest of your makeup light. If you are playing up the eyes, keep your mouth light with a gloss or light lip color that doesn't stand out.
  2. For "plump" lips, apply liner just outside your natural lip line. Dab a bit of gloss in the middle of your bottom lip.
  3. How to apply lipstick? I don't believe in rules to applying lipstick. Some women use special lipstick brushes (pictured here). I own one and never, ever use it. Others use their middle finger (I once said this was a beauty faux pas and got reamed by a reader, I have since changed my mind). Most women apply right from the tube. Choose what's right for you, as long as the color gets on the lips, you're good.
  4. Use liner on your lips as a base. Lipstick will last longer if you fill in your lips with the liner first. If you're using light lipstick, try a nude liner. Then slick your lipstick on top.
    Lip gloss is infamous for wearing off fast, but if you fill in lips first with the liner, the gloss has something to stick to.
  5. You can line before or after you apply lipstick or gloss. Some women prefer to apply liner first, arguing that you won't be able to see the natural line of your lips if you apply lipstick first. But I find lips look more natural when I line lips after I apply lipstick.
  6. Never use a dark liner with light lipstick. Defined lips are great, but make sure the liner matches the lipstick or gloss. Dark liner and light lips is tacky.
  7. Don't test lipstick on your lips. It's just plain unhygienic unless you wipe off the lipstick with a big swipe of a tissue. Even better, test lipstick on your fingertips. It's a closer fit to your lips than the back of your hand.
  8. Don't throw out a bad color lipstick. Beauty editors know you can create a great lip color by blending lipsticks you don't like. You can also color in lips with a darker liner before applying a lipstick that's too bright.
  9. Keep lipstick off glass. Discreetly lick your lips before taking a sip from a glass. It works!
  10. Keep lipstick off your teeth with this trick. After applying lipstick, take your index finger and pop it in your mouth, then pull it out. The excess lipstick will come off on your finger rather than your teeth.
  11. Lipstick can act as a blush. But never use blush as a lipstick.
  12. The older you are, the "creamier" your lips should look. As we age, our lips thin out. Therefore, you should avoid matte and gloss and stick with a creamy lipstick. Also, watch out for dark lipsticks.
  13. Not all lipstick shades look good on everyone.Your skin color will determine what shades are right on you. You may like a lipstick on your friend, but it may not look good on you. Orange or brown shades, including corals, look good on few people. These shades tend to make teeth appear yellow.
  14. Camouflage yellowed teeth. To downplay a yellow cast to teeth, try lipsticks with a bluish undertone. Shades that work include plums, pinks, wines and violets, according to Lazarus, a NYC makeup artist, in O magazine.
  15. Heal -- don't throw out -- a broken lipstick. If your lipstick breaks off, simply take off the broken portion with a tissue, then slowly wave a lit match under the broken piece of lipstick. When it's melted a bit, put it back on the base, swivel it down and put it in the fridge -- uncovered -- for 30 minutes.
  16. Lipstick done? You might notice there's still a bit of lipstick down in the tube. Scrape out the last bits with a cotton swap or orange stick and mix it wit

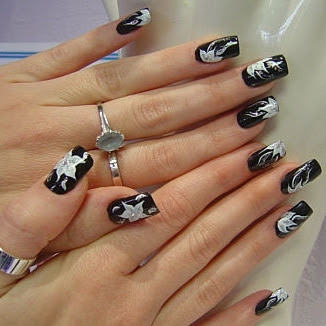
NAIL ART


HOW TO DO NAIL ART


Nail Art Basics (Preparation & Base Coat Application)

  1. 1
    Make sure your nails are in good shape. Learn how to keep your nails healthy and have beautiful nails. Your nails should not be bitten. You don't need a manicure to start creating nail art, but you do need to make sure that your nails are clean and shaped well enough that they look even.

     Best Range of Nail Makeup Products. Free Shipping. Cash on Delivery.
    • Also make sure that your cuticles are nice and healthy. Keep them from peeling. To make them soft you can use petroleum jelly.
  2. 2
    Choose the right products. There are a multitude of different paints and polishes available for nail art, and your choice of products is completely up to you. Experiment with a few different brands and types of polish or paint to see which you like best, and don’t forget to give acrylic craft paints a try — these work great and are a whole lot cheaper than nail paints or polish.
    • You’ll also be able to choose from a variety of implements to help you apply your paint. You can buy professional-grade nail art kits that include all the brushes, strippers, and marbling tools you’ll need, or you can improvise. A toothpick or bobby pin, for example, can help you apply dots and swirl colors with precision, and thin-tipped detail brushes available at your local arts or hobby store can work just as well as special nail art brushes. In addition, remember that you can create art on your natural nails or on artificial tips, and the variety of artificial nails is truly dizzying.
    • Perhaps most importantly, though, make sure you have pure acetone for quickly removing mistakes, and have a small brush and/or Q-Tips, makeup pads, or cotton balls available solely for applying the acetone.
  3. 3
    Look for ideas and techniques. This article is a good primer, but if you have trouble coming up with ideas after a while, or if you want to get more in-depth information about techniques, consider these options:
    • Taking a class at your local nail salon. Just a few hours with a professional teacher can advance your skills like years of practice.
    • There are also a number of books on nail art. You may be able to find one in your local library or bookstore, but if not, buy them online.
    • Finally, the web is a great resource, especially if you’re just looking for new ideas. There are several sites on which people post their latest creations, and you can also find a few forums frequented by beginners and pros alike. Also, watch videos on sites such as YouTube that show you step-by-step how to do certain designs.
  4. 4
    Get your materials ready. While nail art requires a lot of patience, you’re also constantly working against the clock when you’re creating it, since the paints and polishes dry fairly quickly. Before you begin, make sure you have everything you need ready and accessible, especially acetone for quickly removing mistakes.
  5. 5
    Give your nails a base coat. Before you begin your nail art you need to create your canvas. Depending on the look you’re going for, you can paint your nails a neutral color, such as clear, white, pale beige or pale pink, or you can paint them any other color you desire. You may also wish to divide the nail into two or three different colors. Do two coats, as it strengthens the nail and gives a better finish. Make sure your “canvas” is neat and even, and allow it to dry thoroughly before proceeding.
  6. 6
    Create your nail art on top of the base coat. Dip your brush or other tool in one color of paint to make sure the paint adequately and evenly covers it. If your brush has globs, excess paint, or not enough paint, you’re going to have trouble painting. Keep your art simple. There’s plenty of room for creativity — you can create pictures, abstract designs, etc. to your heart’s content. However, don’t make your nails look too “busy.” Simple designs are often the most beautiful, and if you’re a beginner your chances of success are far greater the simpler your art is.
  7. 7
    Apply a top coat. Once all your nail art is dry, paint over it with a clear protective acrylic top coat to seal and protect your nail and your hard work.
  8. 8
    Care for your art. Reapply a clear top coat every two or three days to protect your art and keep your nails looking shiny. Apply cuticle oil daily. Treat your nails with care — wear gloves when gardening or doing other work, and exercise caution when performing tasks such as opening soda cans, as they may damage your nails.


Tuesday 10 July 2012

mehandhi designs


HOW TO KEEP MEHANDHI?

TIPS TO KEEP MEHANDHI:

Henna is basically a dye that gives a cooling effect when applied on the skin and gives red color to it. It is mostly used on hair as a natural dye but is commonly used to decorate hands.
When it dries completely, the skin or hair is washed with water to reveal the dyed color.
Asian brides are not complete until they have applied Henna on their hands and feet.

In this instructable, I will show you how to apply Henna on hands and make different designs with it.

What will you need:
Henna(mehndi) cone (pencil cone is better)
A printed copy of Henna design
A transparent Glass sheet (you may use clear plastic sheet instead)
Tissue paper
Glitter cone (optional)
A4 sheet or plain piece of paper
Pencil

Things to Remember
Nowadays the henna cone contains some chemicals, so if you are allergic or your skin is sensitive, then check a little amount of henna on your palm before making the whole design. If it gives you itcy or burning feeling, do not use it. Sometimes, it happens when the henna is expired so make sure to use the fresh one.

Also, if you have done waxing on an area where you are going to apply henna, do not do it just after waxing. Wait a day or two, as skin pores will be opened and henna contains some chemical. This situation may cause damage or irritation on your skin.

Henna gives different color on different skins. On palms, the color is darkest, near to black sometimes. On the other side of hand, the color is much lighter and then on arm it gets lighter. The color comes best after one or two days. You will notice the difference of the color everyday, first it goes darker, then after few days, it goes lighter and finally its gone!


MEHANDHI COLLECTIONS

simple mehandhi design

mehandhi design for beginners

simple design

design for functions

new mehandhi design

arabic design

front and back mehandhi design

old design


simple design

mehandhi for legs:

simple design

this design can be kept easily..

arabic design for legs

heavy design